2 3

Pages

Saturday, September 21, 2013

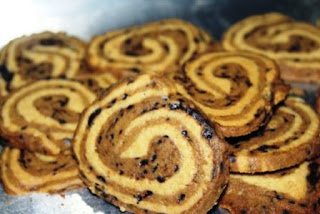
ROLLED UP TIRAMISU COOKIES

This time, the fabulous Italian dessert comes in another form. 


Now who can resist the fine blend of coffee, cream cheese and rum altogether?


My kitchen SMELLS HEAVENLY even hours after baking them. Stored them in the cookie jar and they're all gone within seconds! (Seriously, I sometimes think I do live among Piranhas).

Anyway, here is the recipe to get started. Found it in my mum's cookie book. Takes long to make, but totally worth all the effort!


Ingredients

  1. 300gr low protein flour
  2. 30gr corn starch
  3. 1/2 tsp baking powder
  4. 1/4 tsp salt
  5. 25gr whole milk
  6. 125gr castor sugar
  7. 100gr margarine
  8. 100gr salted, chilled butter
  9. 25gr mascarpone cheese (I LOVE IT!)
  10. 1 tbsp rum
  11. 1/4 tsp Tiramisu extract/essence
  12. 1/4 tsp Mocca-flavoured paste
  13. 1 tsp instant coffee, mixed in 1 tsp of hot boiled water
  14. 35 gr shaved dark cooking chocolate
  15. 1 egg yolk

Directions 


  1. Beat the margarine, chilled butter and castor sugar in high speed for about 2 minutes.
  2. Add in the mascarpone cheese, egg yolk, and rum. Fold until all are incorporated.
  3. Add the dry ingredients. Be careful to not overstir it (as usual ;) )
  4. Now the batter should look dense enough to be called a dough.
  5. Divide the dough into two equal parts.
  6. Add in the Mocca paste, Tiramisu extract and instant coffee to one part of the dough
  7. Roll each part in separated place.
  8. Shape up the dough into flat rectangles (it should feel as if you're rolling a pizza dough)
  9. Stack the brown dough underneath the white one. Continue doing it until no dough is left (order : brown-white-brown-white-brown)
  10. Roll the beautiful dough layers into a big log (as if you're rolling a Sushi roll)
  11. Refrigerate the log in the freezer for about 1-2 hours
  12. Once it's set, cut the log into pieces. By this time, they should look lovely with layer inside of them.
  13. Now bake the cookies for about 25 minutes, 140 degree celcius.

Your cookies should be done now. Enjoy them with a cup of coffee :)


Sunday, September 15, 2013

SWEET CHEESE COOKIES


Or should I say... biscuits?
Any name should work just fine, I guess.

Tried on this new recipe for this weekend, and it turned out awesome!
A cute mix of cream cheese, butter and caster sugar makes these cookies so light and crispy, savory with a little hint of sweetness.

One does not simply get their hands off the cookie jar with these babies.

Here is how to get started :

Ingredients

125g unsalted butter ( stored in room temperature)
50g margarine
2 egg yolks
125g cream cheese
100g cheddar cheese
50g parmesan cheese

140g flour
25g  corn starch
1/2 tsp salt
1 tsp baking powder
100gr caster sugar

How-to : 

1. Beat the butter, cream cheese, caster sugar and margarine until light and fluffy. About 1-2 minutes.
2. Add in the egg yolks, one at a time.
3. Add in the mix of dry ingredients.
4. Fold in the batter gently, adding parmesan cheese.
5. Pre-heat the oven to 140 degree celcius. Prepare the cookie tray.
6. Scoop a teaspoon of the batter (it should be golf-ball sized or smaller) and place it  to the cookie tray.
7. Gently press the surface with tip a fork, and sprinkle cheddar cheese on top.
8. Bake them for about 30 minutes or until golden brown and crispy.
baking in the oven! :D


Stored cookies in the almost-full cookie jar. 


Friday, September 6, 2013

Fluffy American Pancakes


Who's up for some fluffy pancakes? I AM! 

It's almost 9.00 pm and there is nothing I crave other than thick, fluffy American pancakes. 
Now, screw you whoever says pancakes are only for breakfast. Pancakes are for anytime. And I mean ANYTIME. 

Making pancakes is the easiest job in the whole universe. You could literally make 'em from scratch. There's a slim chance you could blow this out.  

Finding the right recipe, however, could be kinda tricky. There are tons of pancakes recipe on the net, but we gotta be really careful in sorting it out. 


This recipe from http://www.bbc.co.uk/food/recipes/fluffyamericanpancak_74828 is for those craving for American thick and fluffy pancakes (because there are many, many variations of pancakes!)

Now, have a look into your kitchen cabinet and grab the listed ingredients (I'm sure you have 'em all) : 


135g plain flour
1 tsp baking powder
½ tsp salt
2 tbsp caster sugar
130ml milk
1 large egg
2 tbsp melted butter 
1 tsp vanilla extract

for topping (optional) : 

Maple syrup
Fresh blueberries

Directions : 

1. In a small skillet, melt the butter (be careful not to burn it). Set aside and let it cool slightly.

2. Sift the flour along with the dry ingredients. Store in a bowl. 

3. In a mixing bowl, lightly whisk the egg until slightly  foamy. This gives the pancakes  the perfect fluffy texture we're looking for. 

4. Add in the rest of the wet ingredients, alternating with the dry ingredients. 

5. Set the batter aside. Let it stand for a few minutes.

6. The batter should look lumpy, but it's fine. DO NOT OVER MIX unless you want rubber-like texture you'd hate to chew on. 

7. Heat the pan, and pour the batter. Make sure the pan is hot, otherwise the pancakes wouldn't rise as expected.

bubbles appearing on the pancake's surface
8. Once you see all the bubbles have appeared on the surface, flip the pancake to see if it's done. 

Your pancakes are now ready to serve!


oh, and don't forget to add the toppings. Or not. Still tastes amazing without one. 

VOILA! 


Monday, March 25, 2013

ANYONE UP FOR CREME BRULEE ? :)


Picture this: a really, really, REALLY soft, creamy pudding delighting your taste buds. Such a sweet treat it is. Originally invented in France, Crème Brulee literally means “burnt cream”- which it simply is. Similar to the traditional caramel pudding and Japanese ‘Purin’, what differs this dessert to them is that uses heavy cream and egg yolks rather than milk and whole eggs. Another difference is that Crème Brulee has a hardened caramelized part as topping- unlike the caramel pudding that has it on the bottom of the dessert. 


I had a pretty hard time finding the right recipe, until I found this Gordon Ramsay’s perfect Crème Brulee on the internet. I gotta say I do have some credibility issue when it comes to recipe browsing; after all, nobody wants to fail over the wrong recipes, right? So when Chef Ramsay’s appears on the search I immediately picked this one.

And it turned out GREAT- as expected. Everybody enjoyed this lovely French dessert.
Care to try some? Here is the recipe to get started. The recipe yields to 4 to 5 ramekins servings.

You’ll need:
  •  300 ml double cream
  • 130 ml milk
  • 40g vanilla sugar
  •  a pinch of salt
  • 1 tsp vanilla extract
  • 4 egg yolks
  •  granulated sugar, to sprinkle for caramel topping

Steps:

  1.  Heat the milk and cream until it is just about to boil, stirring in a dessertspoon of sugar and a pinch of salt. Allow them to cool.
  2.  Lightly whisk together the remaining sugar, vanilla extract, and the yolks.
  3. Reheat the cream until about to boil. Pour it into the yolks mixture and whisk it. Strain the mixture and pour into the ramekin dishes.
  4. Fill a large roasting tin half full of boiling water. Put the ramekins in and bake at 80o C for 10-15 minutes until just set.  
  5. Allow to cool in the fridge.
  6. Finally, dust the top with granulated sugar. Using a handy baking torch, burn the topping until it is caramelized. If you don’t have one, simply bake them again under upper heat of the oven for about 15 minutes or until the caramel appears.
  7. Serve them warm, or chilled.  (Tastes better when chilled, of course!) 


Tuesday, March 19, 2013

MUSTARD-FILLED BITTERBALLENS


FINGER-LICKING SNACK TIME!


Well I gotta say, this is one out-of-the-theme post. Bitterballens are supposedly deep-fried snacks, not the oven-baked ones. But anyway, I feel like I need to post this, so... here we go.

I HAVE A THING FOR DUTCH FOOD, to begin with. They're rich and creamy, but somehow uniquely spicy. Bitterballens are one of my favourite Dutch food. They're relatively EASY to make, finger-lickin' good, and  are perfect for any occassion. 

Here is the recipe to these yummy treats :

Ingredients :

  • 300gr minced meat
  • 3 cloves of garlics, finely chopped (or grated, however you like it)
  • 1 onion, finely chopped (you could use 6 shallots to substitute)
  • 4 tbsp unsalted butter
  • 120gr all-purpose flour, sieved
  • 400ml heavy cream
  • 1/2 tsp nutmeg powder
  • 2 tsp salt
  • 2 tsp white granulated sugar
  • 1/2 tsp pepper (or more, however you like it)
  • 50 gr grated Cheddar cheese
  • 1 tsp Mustard
  • a sprig of parsley, finely minced
For coating :
  • 2 eggs, mixed
  • 4 tbsp all-purpose flour
  • Breadcrumbs
How-to :
  1. Lightly toast the minced meat in a pan. No oil, butter, or water needed. You just want to get the meat done and get rid of the raw smell. Use small heat, and toast for about 5 minutes or until the meat is cooked through. Turn off the heat and set it aside.
  2. In a medium sauce pan, add in the butter, saute the garlic and onion until perfectly golden brown and caramelized. 
  3. Add the sieved flour to the pan. Mix well, try not to incorporate the flour without burning it. Use small heat to avoid it.
  4. You can see that the mixture is now a bit lumpy. It is time to add in the heavy cream gradually to the mixture.
  5. Add the toasted meat, nutmeg powder, grated cheese, mustard, and minced parsley
  6. Add salt and pepper to taste.
  7. Now that the batter is done, it is time to divide them to golf-ball-sized parts. However since the batter is still hot and is highly impossible to shape, you might want to set the batter aside to cool, or simply store it in the fridge for about 2 to 3 hours.
  8. Having been chilled down, you can now shape them up. Take about 1 tbsp of the batter, make a golf-ball-sized part and set it aside. When all of the batter is perfectly shaped, store them in the fridge (again) and let cool for an hour. 
  9. Now here comes the messy part. Coat the Bitterballens (dip in the eggs mixture first, followed by flour and finally breadcrumbs afterwards).
  10. If you're in a hurry, you could immediately deep-fry these babies and serve them with chilli sauce. If you're not, you might want to store them in the fridge and fry 'em later.

PS : Bitterballens could only last for 3-4 days in the fridge. Don't store them too long or they'll flatten when fried. Happened to me a couple of days ago and I am sooo upset about it. :(


FEEL FREE TO TRY THIS UP. 

GOODLUCK! :D


MOIST CLASSIC FUDGE BROWNIE


Who hates brownie? 

Punch me in the face if I see any hands rise up. Yes, everyone LOVES this delightful, chocolatey cake. Having tasted so many brownies in town, I haven’t found anything that is similar to my mum’s classic brownie I used to eat in my childhood. Its moist texture and classic taste has always been a secret to discover. It’s a classic recipe, she said. Though it takes longer time and slightly different technique than the usual brownie, it’s really worth the try!

So what makes it different than any other brownie recipe? The answer lies in the ingredients and technique. If most brownie recipe uses milk, this one uses yoghurt. Why yoghurt? Turns out that yoghurt takes part in making moist brownie rather than milk. Another different ingredient is unsalted butter to replace vegetable oil in most recipes. The fat contained in butter helps softening the batter and builds a cake-like fluffy texture of the brownie.

Enough with the theory. I’m not a baking expert myself, so I’ll just move on to the making of this yummy brownie.   I tried making it today, and the result is just as perfect as expected! How crazy is that. The brownie tastes very chocolatey, not too sweet (the way I like it), aaaaaaaand moist as planned.

Never have I been so happy before (yeah, since most of my baking experiment always turns out to be disastrous), so I decided to share the recipe in this blog. Enjoy! :)


For this recipe, you’ll need :
  • 100 grams of Cake Flour or All-Purpose Flour
  • 3 ½   tablespoons of fine quality cocoa powder
  • 60 grams of unsalted butter
  • 150 grams of granulated or caster sugar
  • ½ teaspoons of salt
  • 1 ½ teaspoons of baking powder
  •  2 whole eggs
  • 125 cc of  low-fat plain or vanilla yoghurt
  • 1 teaspoon of vanilla extract
  • Chocolate sprinkles (optional)
  • 20x20 cm mould.
  • Electric mixer
  • Preheated oven : 150 degree  C.

As I wrote before, there is a slightly different technique of making this brownie, right? Yep, it lies in the method. Unlike most brownie that uses a simple method (only a single manual whisk required) to mix all the dry and wet ingredients (vegetable oil and egg altogether) with a simple and quick stir, here we use a classic, time and energy-consuming method but worth the result.

Now, first thing you wanna do is beat the butter and sugar until smooth and fluffy using the mixer (takes for like half an hour). Then, add the eggs (one at a time), yoghurt, and vanilla extract until all is incorporated. Turn off the mixer. Add in the dry ingredients- the brownie mix (flour, cocoa powder, baking powder, and salt). Stir the batter gently using rubber spatula until all is incorporated and less lumpy. 

Do not mix too hard unless you want a hard, rock-like brownie. When you’re done, pour the batter onto the butter-coated mould, add the chocolate sprinkles on the top, and put it in the preheated oven. Place it the center rack, and bake for approximately 45 minutes. When the time has elapsed, insert a tooth pick to see if it’s done. If not, bake for another 10 minutes. Wait for it to cool, and serve.


Bon appétit! ^,^

Saturday, March 16, 2013

MAKING BREAD PUDDING FROM SCRATCH


One rainy afternoon and I was craving for some comfort food. Checked out the fridge, found nothing but milk, eggs, and some plain white breads (that have been there for nearly a week). Thank the cold temperature they didn't go stale whatsoever. These pitiful breads gave me the idea of making a humble bread pudding from scratch ,just like what my grandmother always does on a cold, rainy day.

Not exactly a comfort food, but you can say it really does give you a comfort sense to your buds. The combination of eggs, milk, breads, and some spicy Spekoek (i'm being fettish on it lately, LOL)  is just perfect and gives me warmth on a rainy afternoon. 

A really, REALLY, simple recipe is all that it takes :

Ingredients :

- A loaf of white bread  
- 1 cup milk
- 2 tablespoon condensed milk
- 4 eggs
- 1/2 cup white granulated sugar
- A pinch of salt (just to balance things up)
- 1 teaspoon Spekoek spice 
- 1 stick Cinnamon
- 4 pcs dried cloves
- Pandan leaves (not necessarily required, i just love using it on milk-based dessert recipes)

Directions :

1. Mix the eggs, sugar, and condensed milk until thoroughly combined.
2. Soak the shredded breads in the wet mixture
3. Add the salt, Spekoek spice, and Pandan leaves.
4. Butter the 20x 20 rectangle tempered-glass mould (I use Pyrex, they're the best)
5. Pour the whole batter into the mould
6. Arrange the cinnamon stick in the center of the batter, the cloves on the four sides of it, and the cut Pandan leaves on the surface (just to decorate it)
7. Bake the batter with au-bain-marie method for about 20 minutes in a 150 degree Celcius oven.


PS : You could simply steam the batter instead of baking it.The reason why I bake it is because the aroma of the batter would come out better when baked than steamed.